Outlook provides some really great features to make your emailing experience easier and faster. However, many users come across a variety of issues while using Outlook. One of these issues is Outlook not being able to access your personal data file. 0x8004010F: ‘Outlook data file cannot be accessed’ is an Outlook send/receive error that usually occurs due to corrupt Outlook profile or inaccessible Outlook data files (OST or PST). The error 0x8004010F appears when you send or receive an email in Microsoft Outlook or Outlook Express. There is Quick Guide Outlook File Data Cannot be Accessed :
Reasons for Outlook 0x8004010F Error
- OST file is corrupt
- The primary account is not set with the primary account OST file
- Incorrect configuration or corrupt Outlook profile
- Firewall settings
- Change in the location of OST file on the machine
- Insufficient read/write permissions
- No internet or unreliable network connection
- Sending/receiving emails via Shared Mailbox
- Copying of old OST file used by previous Outlook version after upgrading
- Damaged Outlook program files
Step1: Make Default MS Outlook data file
Select Start, and select Control Panel.
In CP, select Mail.
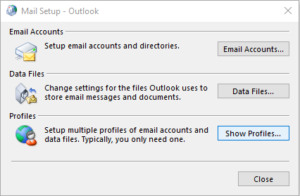
In the Mail-Setup – MS Outlook dialog box, select Show-Profiles.
Select your current Outlook profile, and then select Properties.
In the Mail Setup – Outlook dialog box, select Data Files.
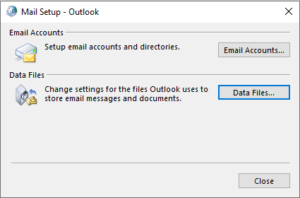
Select the Data Files tab in the Account Settings dialog box, and then note the name and location of the default data file for your profile (a check mark will denote the default data file).
Step 2. Create a new Outlook profile
- Press Windows Key + X to open Win+X menu and choose Settings from the list.
- In Settings click on Accounts > Email & accounts.
- Click the Add an account button.
- Add an account window will appear. Select E-mail Account option, enter your profile name and the required account information. Click Next.
- Click Finish and your account will be created.
Step 3: Repair the Outlook
- Firstly, you will need to open the Control Panel on your computer.
- Click Mail on the left side panel.
- Choose the option Repair.
- In some time, this process will repair the Outlook.
Step 4 : Gain Ownership of Your Outlook Data File
- Launch File Explorer and navigate to the directory with your Outlook data file. Use the first section of this guide to find out where Outlook stores data files.
- Right-click the Outlook data file and select Properties.
- Click the Security tab and select Advanced.
- Click Change next to the Owner to change the owner of the selected file.
- Place the cursor in the Enter the object name to select field, enter the computer user name, and click Check Names. Then click OK.
- Make sure the Access column next to your username says Full Control. Then click OK.
Step 5: Specify the Outlook inbox folder
- Click the File
- Select the Account Settings
- Choose the Change Folder
- Locate the folder and click the Plus symbol adjacent to it.
- Select Inbox and click the Ok
- Now you can close the Account Settings
- Click the Send and Receive button to fix the Outlook data file error.
Step 6: Turn off ‘Windows Defender Firewall’
Your ‘Windows Defender Firewall’ may be the problem. To ensure it is not blocking Outlook, press the Windows+S key on your keyboard. Then input Firewall in the search box to open ‘Windows Defender Firewall’. The next click turns off the Windows Defender Firewall located on the left of the control panel windows. Turn off both Windows Defender Firewall radio options to disable WDF and click the ‘OK’ button next to exit the window. The error has been fixed and you can once again send and receive messages with Outlook.