Solar panels for home is a free from electricity billing decision for homeowners. Solar energy for residence brings many intuitive benefits such as reducing paying monthly bills, increasing the land value, income from selling ideal units, etc.Henceinstalling a solar energy system at your home is an effortless method to stop paying for electricity. Also, you can become energy independent by producing your own energy.
As well as the aesthetic benefits, roof-integrated solar panels also require minimal maintenance since there are no visible fixings or space underneath the panels where debris can build up. Integrated solar panels are also easy to install. In new-build projects, the panels and flashings are attached to the roofing battens, and then tiles are laid around them. This means less time is spent laying roof tiles, as the solar panel acts as the roof covering. On retrofit projects, simply remove a section of tiles and install the solar panels in their place.
Solar Panel Installation Process (8 Steps How to Install Solar Panel: Step-by-Step Guide)
Step 1st. Set Up Scaffolding
Firstly, you need to erect scaffolding to ensure safety during the whole installation process when being on the roof.
Step 2nd. Install Solar Panel Mounts
Then, the solar panel mounting system has to be set up. This will support the base of the solar panels. The whole mounting structure must be tilted and have an angle between 18 to 36 degrees to have maximum sunlight exposure.
Step 3rd. Install the Solar Panels
When the mounts are set up, the solar panel itself has to be installed on the mounting structure. Make sure to tighten up all the bolts and nuts so that it stays stable.
Step 4th. Wire the Solar Panels
You Must Need to install the electrical wiring. In most cases, MC4 connectors are used because they are suited for all types of solar panels. Make sure to shut off the household’s electricity supply during the wiring installation.
Step 5th. Install Solar Inverter
After that, the solar inverter must be connected to the system. It is typically installed near the main panel and it could be both indoors and outdoors. Inverters are more efficient if kept in a cooler place.
Step 6th. Bond Solar Inverter and Solar Battery
Thereafter, the solar inverter has to be connected to the solar battery. The solar battery storage can save you from worrying about the lack of usable energy during cloudy times, it can also lower the solar battery storage system costs during installation.
Step 7th. Connect the Inverter to the Consumer Unit
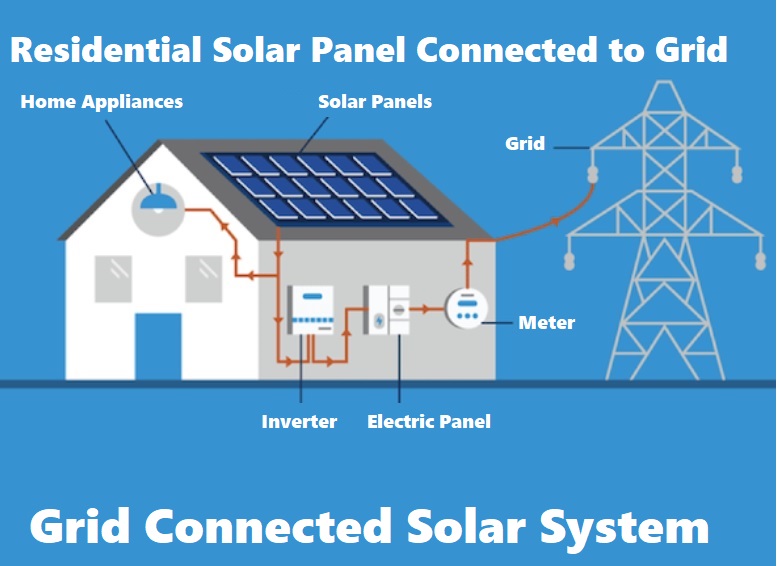
The inverter should be connected to the consumer unit to generate electricity. A generation meter should also be connected to monitor the amount of electricity the solar panels actually produce. You can use your computer or other device to check your solar system’s performance. For example, you can check how much electricity you generate at different times and decide what time is suitable for using your washing machine or other utilities.
Step 8th. Start and Test Solar Panels
The final step is to switch the power on and test the newly installed solar panel system. After that, the solar panel installation process is completed.
CAN I INSTALL SOLAR MYSELF?
Right now, the best way to install solar is through a qualified professional who holds a certification to do so and works with high-quality solar panels. The industry-standard certification is awarded through the North American Board of Certified Energy Practitioners (NABCEP).
Benefits
- Cut your electricity bills
- Reduce your carbon footprint
- Receive payments for extra energy you generate
How do solar panels work?
A solar PV panel consists of many cells made from layers of semi-conducting material, most commonly silicon. When light shines on this material, a flow of electricity is created.
The cells don’t need direct sunlight to work and can even work on cloudy days. However, the stronger the sunshine, the more electricity generated.